| SUSE LINUX – Administration Guide Chapter 22. Linux in the Network / 22.10. NFS — Shared File Systems | ||||
|---|---|---|---|---|
 | 22.9. LDAP — A Directory Service | 22.11. DHCP |  | |
| SUSE LINUX – Administration Guide Chapter 22. Linux in the Network / 22.10. NFS — Shared File Systems | ||||
|---|---|---|---|---|
| 22.9. LDAP — A Directory Service | 22.11. DHCP | | |
As mentioned in 22.8. “NIS — Network Information Service”, NFS (together with NIS) makes a network transparent to the user. With NFS, it is possible to distribute file systems over the network. It does not matter at which terminal a user is logged in. He will always find himself in the same environment.
As with NIS, NFS is an asymmetric service. There are NFS servers and NFS clients. A machine can be both — it can supply file systems over the network (export) and mount file systems from other hosts (import). Generally, these are servers with a very large hard disk capacity, whose file systems are mounted by other clients.
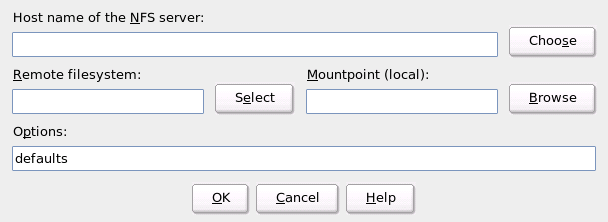
Any user authorized to do so can mount NFS directories from an NFS server into his own file tree. This can be achieved most easily using the YaST module . Just enter the host name of the NFS server, the directory to import, and the mount point at which to mount this directory locally. All this is done after clicking in the first dialog (Figure 22.27. “NFS Client Configuration with YaST”).
File systems can easily be imported manually from an NFS server. The only prerequisite is a running RPC port mapper, which can be started by entering the command rcportmap start as root. Once this prerequisite is met, remote file systems exported on the respective machines can be mounted in the file system just like local hard disks using the command mount with the following syntax:
mount host:remote-path local-path
If user directories from the machine sun, for example, should be imported, use the following command:
mount sun:/home /home
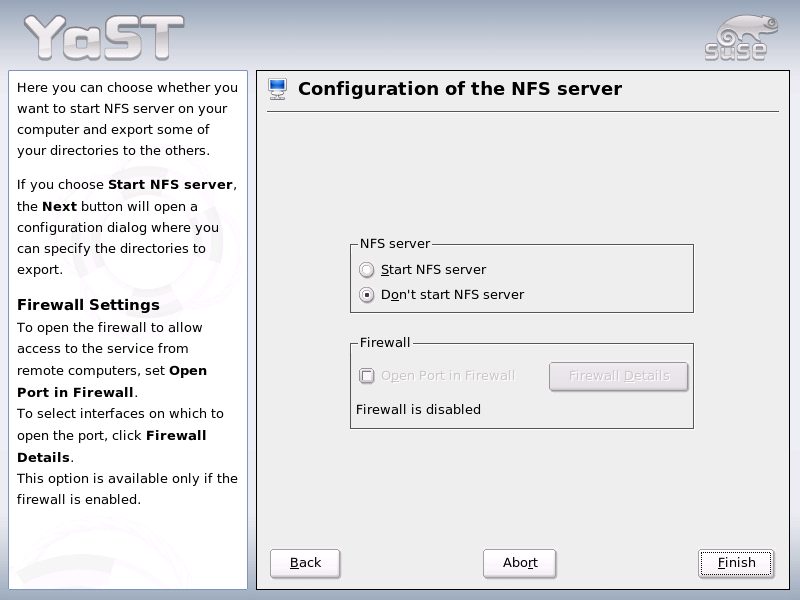
With YaST, turn a host in your network into an NFS server — a server that exports directories and files to all hosts granted access to it. This could be done to provide applications to all coworkers of a group without installing them locally on each and every host. To install such a server, start YaST and select + (see Figure 22.28. “NFS Server Configuration Tool”).
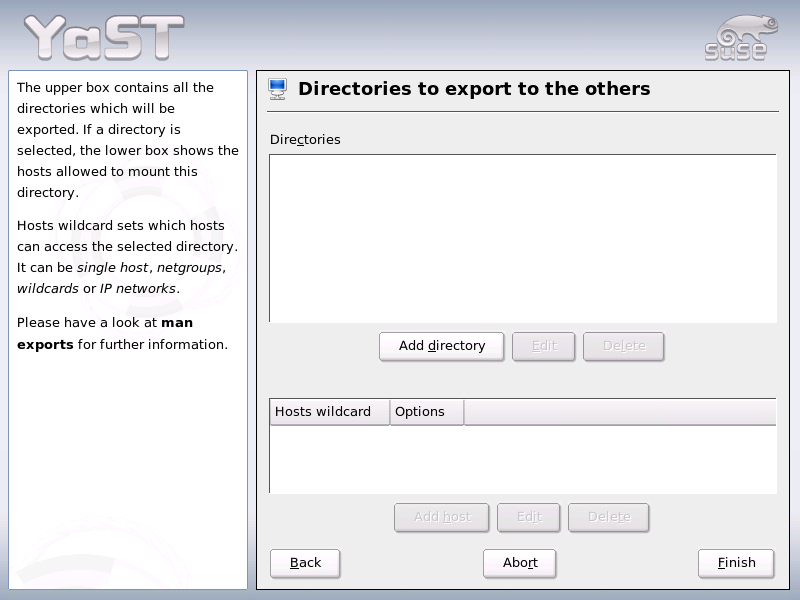
Next, activate and click . In the upper text field, enter the directories to export. Below, enter the hosts that should have access to them. This dialog is shown in Figure 22.29. “Configuring an NFS Server with YaST”. There are four options that can be set for each host: single host, netgroups, wildcards, and IP networks. A more thorough explanation of these options is provided by man exports. completes the configuration.
![[Important]](admon/important.png) | Automatic Firewall Configuration |
|---|---|
If a firewall is active on your system (SuSEfirewall2), YaST adapts its configuration for the NFS server by enabling the nfs service when is selected. | |
If you do not want to use YaST, make sure the following systems run on the NFS server:
RPC portmapper (portmap)
RPC mount daemon (rpc.mountd)
RPC NFS daemon (rpc.nfsd)
For these services to be started by the scripts /etc/init.d/portmap and /etc/init.d/nfsserver when the system is booted, enter the commands insserv /etc/init.d/nfsserver and insserv /etc/init.d/portmap. Also define which file systems should be exported to which host in the configuration file /etc/exports.
For each directory to export, one line is needed to set which machines may access that directory with what permissions. All subdirectories of this directory are automatically exported as well. Authorized machines are usually specified with their full names (including domain name), but it is possible to use wild cards like * or ? (which expand the same way as in the Bash shell). If no machine is specified here, any machine is allowed to import this file system with the given permissions.
Set permissions for the file system to export in brackets after the machine name. The most important options are:
Table 22.13. Permissions for Exported File System
| option | meaning |
|---|---|
| ro | File system is exported with read-only permission (default). |
| rw | File system is exported with read-write permission. |
| root_squash | This makes sure the user root of the given machine does not have root permissions on this file system. This is achieved by assigning user ID 65534 to users with user ID 0 (root). This user ID should be set to nobody (which is the default). |
| no_root_squash | Does not assign user ID 0 to user ID 65534, keeping the root permissions valid. |
| link_relative | Converts absolute links (those beginning with /) to a sequence of ../. This is only useful if the entire file system of a machine is mounted (default). |
| link_absolute | Symbolic links remain untouched. |
| map_identity | User IDs are exactly the same on both client and server (default). |
| map_daemon | Client and server do not have matching user IDs. This tells nfsd to create a conversion table for user IDs. The ugidd daemon is required for this to work. |
Your exports file might look like Example 22.29. “/etc/exports”.
Example 22.29. /etc/exports
#
# /etc/exports
#
/home            sun(rw)   venus(rw)
/usr/X11         sun(ro)   venus(ro)
/usr/lib/texmf   sun(ro)   venus(rw)
/                earth(ro,root_squash)
/home/ftp        (ro)
# End of exports
/etc/exports is read by mountd and nfsd. If you change anything in this file, restart mountd and nfsd for your changes to take effect. This can easily be done with rcnfsserver restart.